As you grow your infrastructure – one of the growing pains you’ll encounter is how to keep an eye on how your systems are running. Sure, you can come in every morning and login to each of your servers, maybe scan the logs and run a few commands like htop and dstat to verify that things are working ok. This approach doesn’t scale very well (it might work for 2 or 3 machines, but will be problematic with 50 machines). So you need something to monitor your infrastructure, ideally something that will do all of the following,
- Monitor all of your systems and notify you if there is a “problem” on any system.
- Store historical data for some key performance parameters on the system (it is useful to understand what kind of loads your systems normally run and whether these loads are increasing over time).
- Provide 1. and 2. via an easy to configure and use interface.
- Provide a nice graphical display of this data – for scanning for performance problems.
- Automatically perform actions on systems being monitored in response to certain events.
There are many open source and commercial applications for monitoring systems which meet the above requirements – see Wikipedia’s Comparison of network monitoring systems for a partial list of so called Network Monitoring / Management Systems.HP OpenView is the 800 lb gorilla of commercial network/system management tools but seems to have morphed into a whole suite of management and monitoring tools now. In Linux circles, the traditional solution for this problem has been Nagios. It has a reputation for being stable and reliable and has a huge community of users. On the other hand (based on my experiences while evaluating a number of different tools), it is configured with a series of text files which take some getting to grips with and a lot of functionality (like graphing and database storage) is provided through plugins (which themselves require installation and configuration). I found the default configuration to ugly and a little unfriendly and while there is a large community to help you – the core documentation is not great. There was a fork of Nagios, called Icinga which set out to address some of those problems – I haven’t checked how it’s progressing (but a quick look at their website suggests they have made a few releases). Kris Buytaert has a nice presentation about some of the main open source system monitoring tools from 2008 (which still seems pretty relevant).
After evaluating a few different systems, I settled on Zabbix as one which seemed to meet most of my requirements. It is a GPL licensed network management system. One of the main reasons I went with Zabbix is because it includes a very nice, fully functional web interface. The agents for Zabbix (the part of Zabbix that sits on the system being monitored) are included in most common distributions (and while the distributions don’t always include the most recent release of the Zabbix agent, newer releases of Zabbix work well with older releases of the agents). Also, Zabbix is backed by a commercial/support entity which continues to make regular releases, which is a good sign. For those with really large infrastructures, Zabbix also seems to include a nicely scalable architecture. I only plan on using it to monitor about 100 systems so this functionality isn’t particularly important to me yet.
While our chosen distributions (Ubuntu and Debian) include recent Zabbix releases, I opted to install the latest stable release by hand directly from Zabbix – as some of the most recent functionality and performance improvements were of interest to me. We configured Zabbix to work with our MySQL database but it should work with Postgres or Oracle equally well. It does put a reasonable load on your database but that can be tuned depending on how much data you want to store, for how long and so on.
I’ve been using Zabbix for about 18 months now in production mode. As of this morning, it tells me it is monitoring 112 servers and 7070 specific parameters from those servers. The servers are mainly Linux servers although Zabbix does have support for monitoring Windows systems also and we do have one token Windows system (to make fun of ). Zabbix also allows us to monitor system health outside of the operating system level if a server supports the Intelligent Platform Management Interface (IPMI). We’re using this to closely monitor the temperature, power and fan performance on one of our more critical systems (a 24TB NAS from Scalable Informatics). Finally, as well as monitoring OS and system health parameters, Zabbix includes Web monitoring functionality which allows you to monitor the availability and performance of web based services over time. This functionality allows Zabbix to periodically log into a web application and run through a series of typical steps that a customer would perform. We’ve found this really useful for monitoring the availability and behaviour of our web apps over time (we’re monitoring 20 different web applications with a bunch of different scenarios).
As well as monitoring our systems and providing useful graphs to analyse performance over time, we are using Zabbix to send alerts when key services or systems become unavailable or error conditions like disks filling up or systems becoming overloaded occur. At the moment we are only sending email alerts but Zabbix also includes support for SMS and Jabber notifications depending on what support arrangements your organisation has.
On the downside, Zabbix’s best feature (from my perspective) is also the source of a few of it’s biggest problems – the web interface makes it really easy to begin using Zabbix – but it does have limitations and can make configuring large numbers of systems a little tiresome (although Zabbix does include a templating system to apply a series of checks or tests to a group of similar systems). While Zabbix comes with excellent documentation, some things can take a while to figure out (the part of Zabbix for sending alerts can be confusing to configure). To be fair to the Zabbix team, they are receptive to bugs and suggestions and are continuously improving the interface and addressing these limitations.
At the end of the day, I doesn’t matter so much what software you are using to monitor your systems. What is important is that you have basic monitoring functionality in place. There are a number of very good free and commercial solutions in place. While it can take time to put monitoring in place for everything in your infrastructure, even tracking the availability of your main production servers can reap huge benefits – and may allow you to rectify many problems before your customers (or indeed management) notice that a service has gone down. Personally, I’d recommend Zabbix – it has done a great job for us – but there are many great alternatives out there too. For those of you reading this and already using a monitoring system – what you are using and are you happy with it?
]]>- Downloaded Mythbuntu 9.10 64-bit edition from the Mythbuntu site.
- Installed Mythbuntu using the standard configuration settings (I may reinstall with a different partitioning scheme in the future but for now, at least, I just need a partition in which to dump various bits of media).
- Connected the MythTV box to my HDTV using a standard HDMI cable.
- Ensure you are using the NVidia Restricted Driver version 180 (and not 173) in order for HDMI audio to work (there is also a newer version 190 driver but I haven’t verified that this works yet).
- During initial MythTV configuration, configured to use ALSA:hdmi for audo playback rather than the default. This is sufficient to have MythTV play video files loaded in /var/lib/mythtv/video correctly.
- While MythTV presents a nice interface, I would also like to be able to use the standard Ubuntu desktop from time to time (Mythbuntu installs an XFCE4 environment by default – you can install GNOME or KDE also if you wish but for occasional use, the standard environment works very well). To get HDMI audio working outside of MythTV (for example, when browsing), added the following to /etc/asound.conf
pcm.hdmi_hw {
 type hw
 card 0     #  <-----  Put your card number here
 device 3   #  <-----  Put your device number here
 }
pcm.hdmi_formatted { type plug slave { pcm hdmi_hw rate 48000 channels 2 } }pcm.hdmi_complete { type softvol slave.pcm hdmi_formatted control.name hdmi_volume control.card 0 }pcm.!default hdmi_complete
and then went to Applications/Multimedia/Mixer and clicked on Select Controls and enabled IEC958 2 and hdmi_volume. Back in the main mixer window, select the Switches tab and enable IEC958 2. Sound over HDMI should now be working (thanks to http://ubuntu.ubuntuforums.org/showthread.php?p=8522729 for tips on this, configuring HDMI sound output can be a little tricky for now at least).
- ALSA includes a useful utility called speaker-test which you can use to test your sound output.
speaker-test -Dplug:hdmi -c2 -twav
Of course this is an experimental system – so not everything works perfectly. In particular, the TV card is not currently picking up output from my UPC cable set-top box (the set-top box includes a standard TV aerial socket on the back which I’ve connected to the Hauppage PVR-150). When I tested the system with Mythbuntu 9.04, I detected a signal from this and could view some television channels (the quality was mediocre but I didn’t attempt any tuning or tweaking) and could use the system as a PVR / DVR – one of MythTV’s key features. Since installing Mythbuntu 9.10, I haven’t detected a signal despite some efforts to configure it. I suspect a kernel driver issue but I have yet to work my way through the IVTV troubleshooting procedure mainly because I’m not very interested in this functionality for the momet at least. It’s something I’ll investigate at some stage, although in the future – I’ll probably be more interested in adding a DVB-T card to the system to avail of Ireland’s Digital Terrestrial Television.
In conclusion – things that are working well include,
- Video playback – both in the MythTVin frontend and from the XFCE desktop (using VLC or Totem).
- Music playback,
- HD playback including using VDPAU. During playback of some HD samples, processor load on the system remained negligible, suggesting that the bulk of the decoding activity is happening on the 9400 rather than on the cpu.
I recently started looking into using a Linux box as a media centre or HTPC. In the past I’ve experimented with so called “multimedia drives” as a solution for managing my collection of media recordings and archived media. The drive I was using was a Lacie Silverscreen and while it worked, it did have various limitations. In particular, it didn’t play HD media and it sometimes had audio sync issues playing back media that played without problems on the PC. I assume the sync issues were the product of either a lack of processing power in the Silverscreen or possibly a lack of codecs. Newer products from Lacie (or similar products from other companies like Iomega’s ScreenPlay) have probably addressed some of these issues and there is no doubt, if you’re a non-technical user, these multimedia drives are a good solution.
In the interests of learning more about how well Linux works as a media solution, I decided to go about building one with a view to installing MythTV on it and evaluating the suitability of a Linux box as a full-featured HTPC. The first step in this experiment was to identify suitable hardware for a HTPC – key requirements for me were,
- Noise – as a machine sitting in your living room beside your TV, the HTPC needs to be quiet. This also suggests it should run cool, it means if you have any fans in the system they won’t need to run at a high speed and/or for long. Key considerations for sound are minimising the number of fans (preferring passive cooling options such as heatsinks if they work), sound reduction features in the box (such as sound insulation and things like rubber/silicone grommets for mounting hard drives, fans and so on).
- Performance – I want the system to be capable of playing back all possible types of media including HD video. I’d also like to have the option of encoding new media on the fly while simultaneously watching something else. All of this means that a reasonably powerful processor and a reasonably high performing graphics card are neccesary.
- Size – as a further consideration, I’d prefer if the unit I build is reasonably small – ideally it shouldn’t be particularly visible in the living room beside or near the TV. For this one, I don’t plan to go to any heroic efforts so I’ll prefer a conventional case over anything amazingly small. As you reduce a PC in size, you start running into heat issues and you start having to use components that have been specifically designed for smaller units – which leads to increasing cost.
- Cost – while not the main driver, I didn’t plan on spending excessively for any particular component of the system. Certainly, a good spec HTPC shouldn’t cost any more than a reasonble spec desktop PC.
After lots of research and review reading, I finally settled on the following spec (note that in February, 2010, at least some of this hardware is well behind the curve – if you’re building a new box now you can probably find improved components for at least parts of this),
- 1 x GIGABYTE GA-E7AUM-DS2H motherboard
- 1 x Intel Core 2 Duo E8400
- 1 x Western Digital Caviar WD10EADS 1TB
- 1 x DDR2 4GB Kingston ValueRAM Kit 800MHz, PC2-6400, 240pin, 2x 2GB Kit
- 1 x LG GGC-H20L Blu-ray SATA
- 1 x Antec Fusion Remote EU Black
- 1 x Seasonic S12II-380 380Watt ATX PSU
- 1 x Hauppauge WinTV PVR-150
- 1 x Arctic Cooling Alpine 7 for Socket 775 (Dual Core)
I chose the motherboard, primarily for the integrated NVIDIA 9400 graphics chipset which provides a HDMI output on the motherboard and also includes support for HD decoding in the chipset (rather than requiring the main system processor – while there is some support for such decoding on chipsets from other vendors, the support for doing this in Linux seems to particularly good with the 9400 using VDPAU). Other components were mainly chosen either because they have a good noise profile or because they give good “bang for buck”. The processor is probably overkill but was relatively cheap and given this system is a testbed for various media experiments, I’d like to have enough processing power just in case. For a typical user, a lower spec processor would be more than sufficient. A similar comment applies to the memory, it is way more than I expect to use but for the price, it didn’t make sense to purchase less. Note that the memory is standard, boring, “value” memory – I’ve experimented with high performance memory in the past and it required various tweaks such as bumping the memory voltage in the BIOS and manually setting memory timings before it performed optimally (or at all) – life is too short for this and the performance gains for a typical user aren’t really noticable (but such memory usually features impressive go faster stripes if thats your thing!
As an aside, since I build this system – NVIDIA have released their ION graphics platform and Intel have released their Atom lower power processor range. These seem to provide the basis for a good HTPC type system (as far as I know, the NVIDIA ION platform is built around a version of the 9400 chipset so it should have similar functionality to my motherboard’s chipset) but I have some concerns about how suitable the Atom processor would be for heavier duty tasks such as transcoding. As always, there is a trade-off between performance and overall size – smaller systems have less room to dissipate heat so they need to run cooler (usually with a lower performance).
For my initial foray into the area, I decided to use Mythbuntu, an Ubuntu based Linux distribution which includes MythTV and is preconfigured to work well connected directly to a TV. Mythdora is a similar idea but based around the Fedora distribution. There is no reason not to install your favourite Linux distribution and install MythTV on top of it if you wish.
My initial experiments were carried out with Mythbuntu 9.04 earlier this year but I thought I’d reinstall with Mythbuntu 9.10 on it’s recent release and document my experiences here, including detailing what works and what doesn’t. See my next posting for details of how things went.
Update: Puzlar sent me a tweet asking what kind of remote control I used with the system. The Antec Fusion case comes with it’s own infrared receiver and remote control. The Hauppage PVR-150 also included it’s own IR receiver and remote control. Since the IR receiver in the Antec Fusion case doesn’t need any additional items to be plugged into the box, I opted to go with that. The MythTV wiki contains details of how to configure the IR receiver to work properly – when I installed Mythbuntu 9.04 it required some manual tweaking but when I installed Mythbuntu 9.10 it worked out of the box without any tweaking as far as I can remember – so the standard keys like the arrows and the play/pause/rewind/forward buttons on the control do what they should do in the Mythtv Frontend and you can move the mouse around the desktop using the control also (which is a bit slow but ok if you just need to point and click on something occasionally). I also have a wireless mouse and keyboard (a Logitech S510 but it seems to have been discontinued in the meantime) for occasional surfing and tuning of the system. I recently tried out XBMC as an alternative interface for the HTPC and that supported all the remote control functionality too (perhaps more than MythTV out of the box) – XBMC looks like a nice alternative to MythTV if PVR isn’t a requirement – I’ll be playing around with it some more.
One other note on the case – the Antec Fusion is a nice case – maybe a little bigger than I expected but it does look more like a piece of HiFi kit than a PC so it blends in well beside the TV. While I thought an LCD panel on the HTPC would be useful, in retrospect I have no need or use for this and if I was going again, I’d probably order a case without an LCD – perhaps something like the Antec NSK2480.
]]>In the beginning, manufacturers created dedicated hardware controllers to which disks were attached. These controllers include their own processor and memory and handle all the RAID functionality within the black box they present to the system (the good ones will even include a battery that lets the controller run for long enough in the event of a power failure so that any data stored in the RAID controller’s cache memory isn’t lost but can be written to the drives when the power comes back). As far as the system the controller is attached to is concerned – the RAID controller is one big disk. This is called hardware RAID.
As machines have gotten more powerful, most machines (certainly most desktop machines) are sitting idle most of the time, so it has become feasible to start using the system for operating system level tasks like providing RAID. All mainstream operating systems provide some form of this software RAID which performs exactly the same functionality as the hardware RAID controller above, but using the system’s processor and memory. There are advantages and disadvantages to both approaches (I’m increasingly leaning towards using software RAID on Linux – low end hardware RAID controllers aren’t very reliable and tend to be slow from an I/O perspective – most modern Linux servers tend to have multiple processor cores which are sitting idle most of the time and are perfectly suited to driving a RAID array) but they both work reasonably well.
In between these two comes something described as Firmware/driver-based RAID, HostRAID or Fake RAID. This is provided by cheap RAID controllers that do not implement all the RAID functionality (normally they are standard disk controllers with some special firmware) and utilise the main system processor for most of the heavy-lifting. They also rely on dedicated operating drivers to provide the RAID functionality, hence the name Fake RAID. I’m not a fan of Fake RAID controllers – apart from the fact that the manufacturers of these controllers rarely make it clear that they are not fully functional RAID controllers, their reliance on elaborate driver software makes them less reliable than hardware RAID but more complex to maintain than true software RAID. They are reasonably well supported under Linux these days using the Device-Mapper Software RAID Tool (aka dmraid) but personally, I prefer to use a Fake RAID controller as a standard SATA controller and if I require RAID on such a system, implement it using Linux’s excellent Software RAID support.
Up to recently, when people installed Ubuntu – if they did want to use their Fake RAID controller as a RAID controller, they ran into the problem of the installer not including dmraid support. Using Ubuntu 9.04 (Jaunty) – the installer detects at least some Fake RAID controllers and prompts you as to whether to use this controller via dmraid or not. If you choose not to, you will then be able to use it as a normal SATA controller.
I ran into an interesting problem on a recent reinstall of Ubuntu 9.04 onto a Supermicro X7DVL system which includes an Intel 631xESB/632xESB I/O controller which supports some sort of Fake RAID (Intel seems to call their Fake RAID Matrix Storage Technology). Given my stance on Fake RAID, I immediately disabled this in the BIOS by changing the controller to compatible mode (the datasheet above suggests this should disable RAID). When installing Ubuntu, the installer still detected the Fake RAID volumes and offered to configure dmraid for me. I declined the option and the native SATA disks (unRAIDed) were presented to me and fully partitioned and formatted.
I thought nothing more of this until I rebooted after completing the installation. The system booted as far as GRUB before dumping the message
No block devices found
It took me a while to figure out what was going on. Google turned up lots of people who had problems with Ubuntu and dmraid, but generally they were having the opposite problem of wanting to use dmraid but the installer not supporting it (like DMRAID on Ubuntu with SATA fakeraid, dmraid missing from livecd and Need dmraid to support fakeraid). Presumably most of these problems have been fixed with the inclusion of dmraid in Jaunty.
This was the clue for me – I finally figured out (with some help from bug 392510 I must admit) that even though I had declined to use dmraid during the install, the newly installed operating system still contained dmraid and was loading the dmraid kernel modules at boot-time. This resulted in the kernel seeing some dmraid volumes rather than the partitions I had created during the OS install.
Once I figured that out, fixing the problem was relatively straightforward,
- Reboot with the Ubuntu 9.04 install cd and select Rescue broken system.
- When the rescue boot has been configured, select Execute shell and chroot into the installed environment.
- aptitude purge dmraid (this removes the dmraid software and the dmraid kernel modules from the initramfs).
- Reboot and enjoy your new OS.
Two things that I found misleading here are,
- I had declined to use dmraid during the Ubuntu install, but it still included this functionality during installation
- I had disabled SATA RAID in the BIOS but it was still visible to Ubuntu. I notice a newer version of the BIOS from Supermicro which may fix this problem but since Supermicro don’t include change log in their BIOS releases it’s hard to tell without going to the trouble of actually installing the update.
I should probably log a bug against the dmraid package in Ubuntu (if I get
around to it, it should appear against the dmraid package) – bug 392510 talks about supporting a nodmraid option to the kernel at boot time which would explicitly disable dmraid, I think this could be a good idea (Fedora apparently already does this).
Update 1: Bug 311637 already addresses this problem so I’ve added a comment to this.
Update 2: Upgrading the Supermicro system to the latest BIOS and disabling the Fake RAID controller through the BIOS seems to fix this problem also.
]]>A little background first: I’m working with some SuperMicro Twin systems (basically, two system boards in a single 1U chassis sharing a power supply – not as compact as a blade but not bad) which includes a nVidia MCP55V Pro Chipset Dual-port LAN / Ethernet Controller. On Ubuntu 8.10 at least, this uses the forcedeth driver (originally a cleanroom implementation of a driver which competed with a proprietary offering from Nvidia – it now seems to have superceded that driver).
I noticed while doing large network transfers to or from one of these machines that the load on the machine seemed to spike. Running dmesg show a lot of these messages,
[1617484.523059] eth0: too many iterations (6) in nv_nic_irq.
[1617484.843113] eth0: too many iterations (6) in nv_nic_irq.
[1617484.869831] eth0: too many iterations (6) in nv_nic_irq.
[1617485.101377] eth0: too many iterations (6) in nv_nic_irq.
[1617485.855067] eth0: too many iterations (6) in nv_nic_irq.
[1617485.896692] eth0: too many iterations (6) in nv_nic_irq.
Google returns lots of results for this message – some people seem to have experienced complete lockups while others noted slowdowns. The proposed solution seems to be to pass the max_interrupt_work option to the forcedeth kernel module to increase the maximum events handled per interrupt. The driver seems to default to running in throughput mode where each packet received or transmitted generates an interrupt (which would presumably ensure the fastest possible transfer of the data) but can also be configured to operate in CPU mode (aka poll mode) where the interrupts are controlled by a timer (I’m assuming this makes for higher latency of transfers but smoother before for high network loads – the documentation on this is a little thin). This behaviour is controlled by the optimization_mode option. You can investigate the options which can be passed to any kernel module by running,
modinfo <module name>
for example,
modinfo forcedeth
So, as an initial pass at tuning the behaviour on the server, I decided to pass the following options to the forcedeth driver.
max_interrupt_work=20 optimization_mode=1
The standard way on Ubuntu 8.10 to set kernel module parameters is to add a line to /etc/modprobe.d/options like the following
options forcedeth max_interrupt_work=20 optimization_mode=1
I tried this and then tried rebooting my system but found it didn’t have any effect (I started seeing the same error messages after running a large network transfer and the max iterations were still referenced as 6 rather than the 20 I should be seeing if my options were parsed).
After trying a few things and brainstorming with the good people on #ubuntu-uk I figured out that you need to run the following command, after modifying /etc/modprobe.d/options
sudo update-initramfs -u
This presumably updates the initramfs image to include the specified options. It is possible this is only needed for modules that are loaded early on in the boot process (such as the network driver) – I haven’t had the need to modify other kernel modules recently (and this stuff seems to change subtly between distributions and even versions).
Following another reboot and a large network transfer, the error messages suggesting that the options are now being parsed (some kernel modules allow you to review the parameters currently being used by looking in the file /sys/modules/<module name>/parameters but forcedeth doesn’t seem to support this).
I figured the trick with update-initramfs was worth publishing for the next person who runs into this problem. I’d also love to hear from others using the forcedeth driver as to what options they find useful to tune the throughput.
]]>While most of you reading this probably don’t plan on purchasing a supercomputer on the scale of Roadrunner or Jaguar in the near future (if you do, we’d love to assist you in the process) our own experience with deploying smaller HPC clusters for organisations is that Linux is equally suitable for smaller clusters for a variety of reasons including the cost of deployment, the flexibility of Linux as a server OS, the wide range of HPC software that is developed on or targetted at the Linux operating system and the excellent support provided by the Linux community for new hardware (see the recent announcement of Linux being the first operating to support USB 3.0 devices as a good example).
]]>What is interesting about this particular piece of work is the equipment that the Linux server is being used to control. The Marine Institute is Ireland’s national agency for marine research, technology and innovation. As part of their work they are involved in a climate change program which requires them to measure data including the temperature, salinity, chlorophyll and oxygen levels of the ocean. Using this data they can model the behaviour of the ocean and understand its role in climate change in Ireland.
As well as using traditional methods for recording this data such as sensors on buoys and ship surveys – the Marine Institute is deploying an unmanned remote controlled vehicle which includes a range of sensors. The remote controlled vehicle or glider can be programmed to follow a specific course, taking measurements at various depths as it travels and sending them back to base periodically. Obviously, this gives far more flexibility than data from a static buoy and costs far less to run than a research vessel.
Which brings us back to the Linux install. The Linux server will operate as the controller for this remote glider – a Slocum electric glider developed by Webb Research. Webb provide software to talk to the glider any time it is on the surface using an Iridium satellite modem. The software allows data to be retrieved from the glider and new routes to be sent to it.
The initial installation went well – after a few teething problems. The glider, which is currently out of the water (having successfully completed initial trials), was powered on and we immediately starting seeing communications between the server and the glider. Initial tests look good and we hope to hear of the Marine Institute successfully deploying this technology in the near future. When in operation, the glider can travel distances of over 1000km and to depths of 1000m.
]]>The group I’m working with, DI2, has a number of interesting projects including Sindice which aims to be a search engine for the Semantic Web and a forthcoming project called Webstar which aims to crawl and store most of the current web as structured data. Webstar will allow web researchers to perform large scale data experiments on this store of data, allowing researchers to focus on their goals rather than spending huge resources crawling the web and maintaining large data storage infrastructures.
Sindice and Webstar both run on commodity hardware running Linux. We’re using technologies such as Apache Hadoop and Apache HBase to store these huge datasets distributed across a large number of systems. We are initially working with a cluster of about 40 computers but expect to grow to a larger number over time.
My role in DI2 is primarily the care of this Linux infrastructure – some of the problems that we need to deal with include how to quickly install (and re-install) a cluster of 40 Linux systems, how to efficiently monitor and manage these 40 systems and how to optimise the systems for performance. We’ll use a lot of the same technologies that are used in Beowulf style clusters but we’re looking more at distributed storage rather than parallel processing so there are differences. I’ll talk a little about our approach to mass-installing the cluster in my next post.
]]>The author makes a good point that what some people chose to view as a disadvantage of open source based systems – that you can choose many different components for an open source system and that you can configure them in a myriad of ways – is, for at least some environments, very much an advantage. I tend to agree. While I like to create homogenous, documented environments for my customers – I do tailor each of those environments to my customers’ requirements – rather than trying to change their processes and workflows to suit the software (an all too common problem which occurs when deploying entirely proprietary systems).
]]>The data generated by the ROMS models we are looking at uses a curvilinear coordinate system – to the best of my understanding (and I’m a Linux guy, not an Oceanographer, so my apologies if this is a poor explanation) since the data is modelling behaviour on a spherical surface (the Earth) it makes more sense to use the curvilinear coordinate system. Unfortunately, some of the visualisation tools, in particular LAS prefers to work with data using a regular or rectilinear grid. Part of our workflow involves remapping the data from curvilinear to rectilinear using a tool called Ferret (also from NOAA). Ferret does a whole lot more than regridding (and is, in fact, used under the hood by LAS to generate a lot of the graphical output of LAS) but in our case, we’re interested mainly in its ability to regrid the data from one gridding system to another. Ferret is an interesting tool/language – an example of the kind of script required for regridding is this one from the Ferret examples and tutorials page. Did I mention we’re not Oceanographers? Thankfully, someone else prepared the regridding script, our job was to get it up and running as part of our work flow.
We’re nearly back to the origins of the title of this piece now, bear with me!
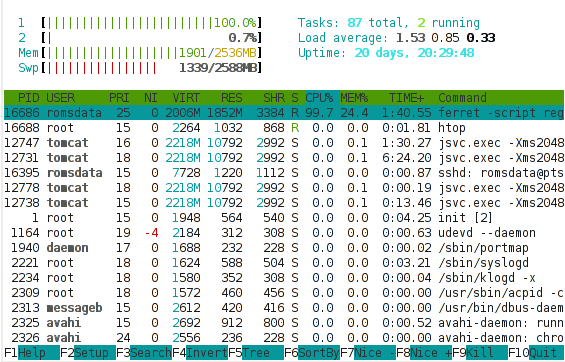
We’re using a VMware virtual server as a test system. Our initial deployment was a single processor system with 1 GB of memory. It seemed to run reasonably well with TDS and LAS – it was responsive and completed requests in a reasonable amount of time (purely subjective but probably under 10 seconds if Jakob Nielsen’s paper is anything to go by). We then looked at regridding some of the customer’s own data using Ferret and were disappointed to find that an individual file took about 1 hour to regrid – we had about 20 files for testing purposes and in practice would need to regrid 50-100 files per day. I took a quick look at the performance of our system using the htop tool (like the traditional top tool found on all *ix systems but with various enhancements and very clear colour output). There are more detailed performance analysis tools (include Dag Wieers excellent dstat) but sometimes I find a good high-level summary more useful than a sea of numbers and performance statistics. Here’s a shot of the htop output during a Ferret regrid,

What is interesting in this shot is that
- All of the memory is used (and in fact, a lot of swap is also in use).
- While running the Ferret regridding, a lot of the processor is being spent in kernel activity (red) instead of normal (green) activity.
High kernel (or system) usage of the processor is often indicative of a system that is tied up doing lots of I/O. If your system is supposed to be doing I/O (a fileserver or network server of some sort) then this is good. If your system is supposed to be performing an intensive numerical computation, such as here, we’d hope to see most of the processor being used for that compute intensive task, and a resulting high percentage of normal (green) processor usage. Given the above it seemed likely that the Ferret regridding process needed more memory in order to efficiently regrid the given files and that it was spending lots of time thrashing (moving data between swap and main memory due to a shortage of main memory).
Since we’re working on a VMware server, we can easily tweak the settings of the virtual server and add some more processor and memory. We did just that after shutting down the Linux server. We restarted the server and Linux immediately recognised the additional memory and processor and started using that. We retried our Ferret regridding script and noticed something interesting. But first, here’s another shot of the htop output during a Ferret regrid with an additional gig of memory,
What is immediately obvious here is that the vast majority of the processor is busy with user activity – rather than kernel activity. This suggests that the processor is now being used for the Ferret regridding, rather than for I/O. This is only a snapshot and we do observe bursts of kernel processor activity still, but these mainly coincide with points in time when Ferret is writing output or reading input, which makes sense. We’re still using a lot of swap, which suggests there’s scope for further tweaking, but overall, this picture suggests we should be seeing an improvement in the Ferret script runtime.
Did we? That would be an affirmative. We saw the time to regrid one file drop from about 60 minutes to about 2 minutes. Yes, that’s not a typo, 2 minutes. By adding 1 GB of memory to our server, we reduced the overall runtime of the operation by 97%. That is a phenomenal achievement for such a small, cheap change to the system configuration (1GB of typical system memory costs about €50 these days).
What’s the moral of the story?
- Understand your application before you attempt tuning it.
- Never, ever tune your system or your application before you understand where the bottlenecks are.
- Hardware is cheap, consider throwing more hardware at a problem before attempting expensive performance tuning exercises.
(With apologies to María Méndez Grever and Stanley Adams for the title!)
]]>